|
A few years ago I came across an article of a boy that connected an inexpensive earthquake alarm to an Arduino with an ethernet shield and had it post an alert on twitter every time an earthquake was detected. In this post We will look at a couple of ways we can connect the Quake Alarm to a microprocessor and discuss the positives and negatives of each method. The alarm used is called "Quake Alarm™". I decided not to upload a photo of the device with the components visible to prevent any complications with the company that makes them. Here is a description of how the device works: "the quake alarm™ is designed to provide instant warning of seismic activity by detecting the "p" wave (compression wave) of an earthquake, which travels faster than the more destructive "s" wave (shear wave). the quake alarm™ saves valuable seconds by removing the guesswork in earthquake detection. it is capable of detecting large earthquakes that occur hundreds of miles away and can detect moderate to minor earthquakes for many miles around your local area." Lets have a look at the circuit and its components.
Note: I am not sure about the original resistor value because I already made some modifications to my device. The circuit looks like this. 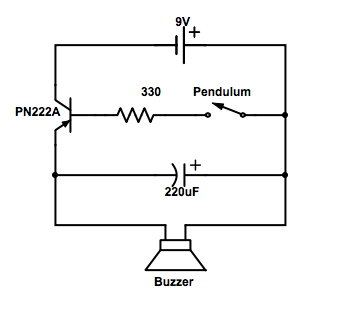 When there is an earthquake, the pendulum starts to swing and touches the sides and creates a closed contact. A current will flow between the base and the emitter and allows a charge to flow between collector and emitter turning on the buzzer. The capacitor smooths out the voltage spikes caused by the fast closing and opening of the switch(pendulum). So how can we modify this circuit so we can read it out with a microprocessor (i will use the word AVR for the rest of the post). The following examples will take into are based on the assumption that the microprocessor uses 5V logic. I will use an Arduino Uno as a reference AVR. Some examples will need to be slightly changed when using 3.3V logic. 1. Reading analog valuesThe easiest circuit is to strip it to remove the battery and connect the AVR to the power connector. The voltage is supplied by the AVR on the positive terminal and the negative terminal is connected to one the the analog capable pins on the AVR. On an Arduino Uno those are pins A0 to A5. Poll the analog pin and when an earthquake causes the pendulum to close the circuit a voltage drop will cause the analog reading to change. Have your program do something when the analog reading goes beyond a certain value. Positives
Negatives
2. Simple switch with Interrupts (digital)If we want to make sure that an earthquake doesn't go unnoticed we can use a hardware interrupt to catch any seismic activity. When an interrupt is triggered it stops execution of the code that was running at the time and executes the code that handles the interrupt. When the interrupt is taken care of it continues execution of the paused program. For this example we only use the pendulum from the Quake alarm and use a 10K pull-down resistor. When the pendulum is open (no earthquake) there is no connection between the two legs of the pushbutton, so the pin is connected to ground (through the pull-down resistor) and we read a LOW. When the pendulum is closed (there is an earthquake), it makes a connection between its two legs, connecting the pin to 5 volts, so that we read a HIGH. For interrupts to work on an Arduino Uno connect either to in 2 or 3. for more info about interrupts on Arduino's click here. 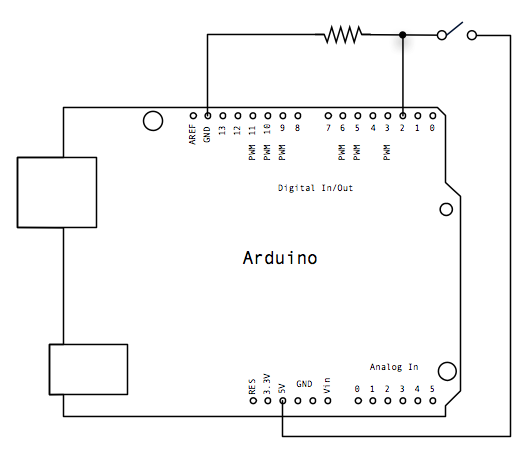 Tip: Add software debouncing to the code for when an earthquake triggers and interrupt to prevent it from registering as a series of earthquakes. Positives:
Negatives:
Whats next?Although there are plenty more ways to connect up a Quake Alarm to an AVR you are either going to create an analog or digital signal and both of these are discussed above.
Now you have a way of capturing earthquakes you have plenty of possible applications. Add a real time clock and a SD card and you can log when earthquakes could be detected at your location. Add an ethernet shield or WiFi capabilities and you can for example send a twitter message when an earthquake is detected. etc. et.
0 Comments
Your comment will be posted after it is approved.
Leave a Reply. |
AuthorGeorge Timmermans, Research Toolmaker, Software Engineer and Tinkerer 
Archives
March 2024
Categories |
 RSS Feed