George timmermans
  • About Me
    • Resume
    • Press releases
  • Blog
  • Projects
    • Long Range WiFi Link
    • Embedded Systems >
      • Photo Booth
      • Classroom VU meter
      • USB Media Controller
      • Weather Station
      • Arduino Swimming Pool Controller
      • GRBL Android Controller
      • Arduino Serial Driver
      • Arduino Multitasking
      • 8x8x8 LED Cube
      • Analog -> Digital Geiger Counter
    • 3D Printing >
      • Simplify3d Configuration
      • 3D print repairs
    • Home Brewing >
      • Mead Recipes >
        • Cinnamon Mead
        • Sweet Chili Mead
        • Lemon & Ginger Mead
        • Mead Liqueur
        • Honey Beer
      • Glühwein (Spiced Wine)
      • Limoncello
    • House
    • Toolmaking
    • Laser Cutting
  • Weather Cam
  • Contact

Netonix Wisp Switch Power Saving Info

28/8/2016

0 Comments

 
Last weekend I went back to Picton for the weekend to celebrate my birthday with family and friends. This gave me the opportunity to swap out the TOUGHswitch TS-5-POE out for the new Netonix WS-8-150-Dc. In this blog post I wanted to show you some of the features related to power monitoring and management,  
Picture
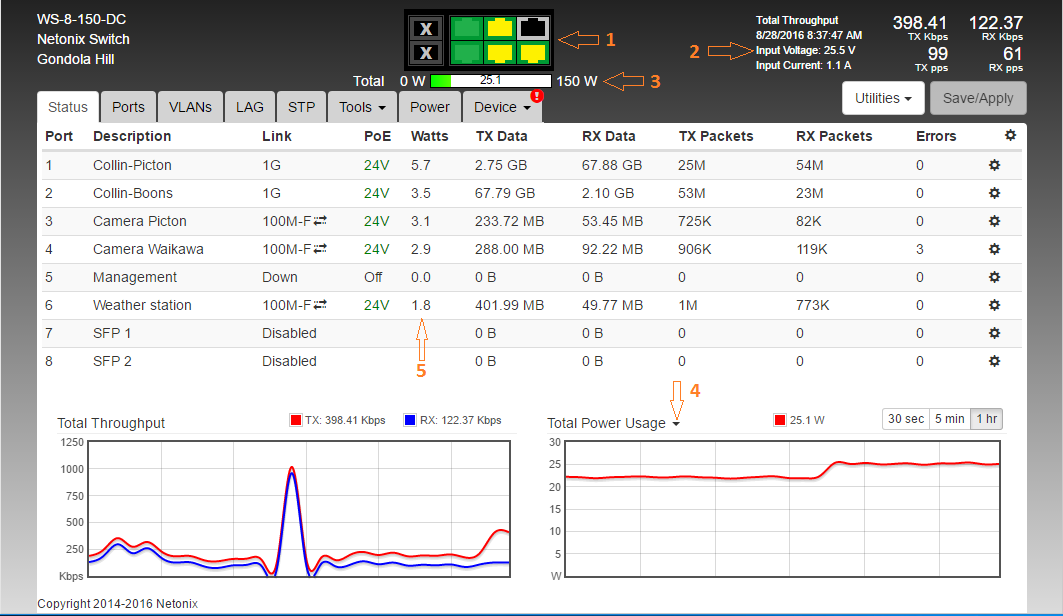
I have drawn in some arrows in the screenshot above and the following will be about those features. 
  1. These are the 2x fiber and 6x ethernet ports. If the outer edge for the port is green then POE has been enabled for that particular port. If the inside portion of the port is marked as green it's a 1Gb connection, yellow is 100Mb and grey is an unused port. When POE is turned off because of low input voltage the port will have a little lightning symbol fading in and out on it. If it's off because of a time based rule it will have a little clock fading in and out on it.
  2. The input voltage is the voltage of your power supply. In my case the voltage of the batteries. The input current is the current drawn from your power supply. Important: Measure the input voltage with a multimeter to determine if there is an offset in the voltage reading.
  3. The power bar shows the power used in real time and the 150W is the maximum power rating for this particular switch
  4. By clicking the little arrow you can choose to view the total power usage over a certain period of time. Up to one hour. The little bump in my graph is when the cameras where automatically turned on.
  5. The "Watts" column show the power draw per device in realtime.
Picture
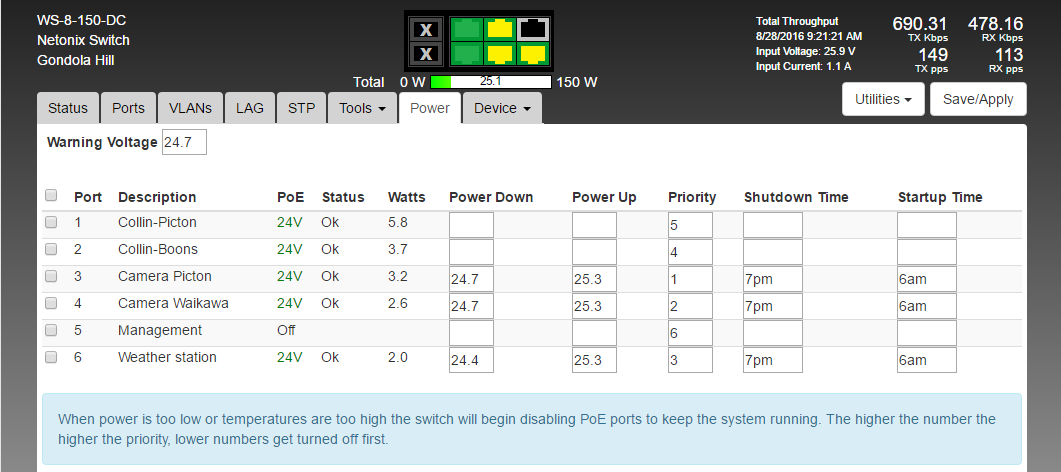
Here you can see the power management page. These are the interesting features.
  • Warning Voltage - When the input voltage drops below the warning voltage it will show in your logs and add a red exclamation mark to the logs and to the device tab.
  • Power down/up - Automatically turn POE off and on for a port depending on the input voltage. Makes sure to add hysteresis to take into account the voltage drop that can occur when your device starts drawing power when the POE is turned back on. Mine are based on the state of charge of the batteries as explained in a previous blog post.
  • Priority - When power is too low or temperatures are too high the switch will begin disabling PoE ports to keep the system running. The higher the number the higher the priority, lower numbers get turned off first.
  • Shutdown/startup Time - Automatically turn POE off and on depending on the time of day (make sure the NTP settings are correctly set up). In my case a save power during the course of the night by turning the cameras and weather station off. Device won't come back online if the "Power Up" voltage haven't been met.
Picture
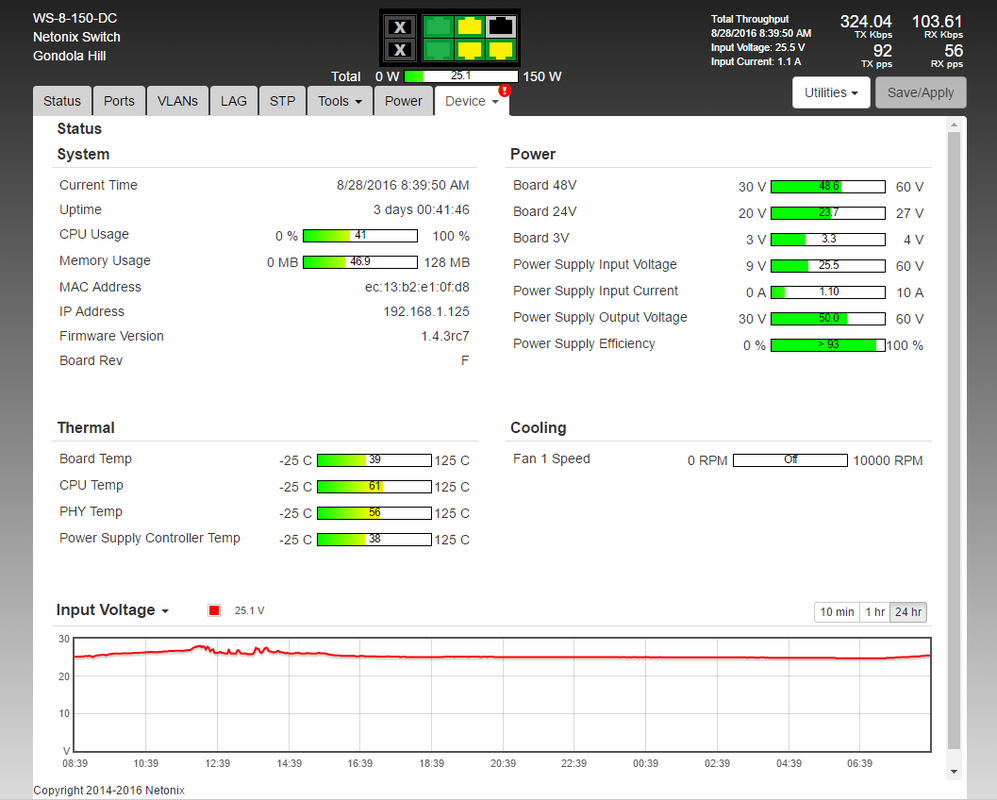
This is the device status tab. Add the bottom we have the input voltage over time. In the screenshot we see the last 24 hours. In my case we are looking at the battery voltage of the last 24 hours. It gives an idea how well they get charged depending how fast the line rises. And sudden drops can be because of POE device being turned on automatically.

What's next?

I would like to set up a SNMP server to collect important data for the whole system and create graphs that go back further than 24 hours. Collecting more data and analyzing it could provide me with some tweaks I could make to the system to create an even more stable system.
0 Comments

Project Failure - 3D printed Speaker Housing

13/8/2016

0 Comments

 
First a little background information about the project. I am replacing the 2"x4" speakers located in the headrest of a 91 Mazda Eunos Roadster, also known als Miata or later models go by MX-5. The original speakers are bad, very bad. And they tend to don't live long. I already replaced them once and after reading around the forums everybody recommends buying some normal 3.5" speakers and cut some of the foam out to make it fit.

I figured, why not 3D print a speaker housing and use the existing mounting holes that are already in the headrest.  As you can see below, I have drawn up a CAD model and 3D printed it. All looking good so far. But when testing it in the car I discovered that hidden under the foam the is one big metal plate with just the 2"x4" hole for the original speakers cut out. Because the cutout isn't big enough i don't have enough depth to nicely fit the new speakers.

I will have to sleep on it before I decide my next course of action. 
0 Comments

    Author

    George Timmermans, Research Toolmaker, Software Engineer and Tinkerer

    View my profile on LinkedIn

    Archives

    January 2021
    November 2020
    July 2020
    May 2020
    November 2019
    August 2019
    January 2019
    October 2018
    January 2018
    November 2017
    October 2017
    August 2017
    June 2017
    May 2017
    April 2017
    March 2017
    January 2017
    December 2016
    November 2016
    October 2016
    August 2016
    July 2016
    June 2016
    May 2016
    April 2016
    March 2016
    December 2015
    November 2015
    October 2015
    September 2015
    August 2015

    Categories

    All
    3d Printing
    Photobooth
    Wisp

    RSS Feed

Proudly powered by Weebly
  • About Me
    • Resume
    • Press releases
  • Blog
  • Projects
    • Long Range WiFi Link
    • Embedded Systems >
      • Photo Booth
      • Classroom VU meter
      • USB Media Controller
      • Weather Station
      • Arduino Swimming Pool Controller
      • GRBL Android Controller
      • Arduino Serial Driver
      • Arduino Multitasking
      • 8x8x8 LED Cube
      • Analog -> Digital Geiger Counter
    • 3D Printing >
      • Simplify3d Configuration
      • 3D print repairs
    • Home Brewing >
      • Mead Recipes >
        • Cinnamon Mead
        • Sweet Chili Mead
        • Lemon & Ginger Mead
        • Mead Liqueur
        • Honey Beer
      • Glühwein (Spiced Wine)
      • Limoncello
    • House
    • Toolmaking
    • Laser Cutting
  • Weather Cam
  • Contact