Long Range WiFi Link For Rural Communities
A good internet connection isn't always available in rural areas. A community living in a valley between Picton and Waikawa is one of those places. Because of its location there is no landline available and cellphone signal is limited to only high spots in the valley. To solve this problem I designed and installed a long range WiFi link with a solar powered repeater station.
Requirements
- Scalability. The system should allow easy configuration of new clients.
- A remote stand alone repeater station is required because a hill prevents a direct Point to Point (PTP) link.
- The remote repeater station should consume as little power possible.
- The remote repeater station should be scalable to accept more hardware in the near future (WiFi antennas, IP camera, weather station).
The Challenge
As mentioned above there is no line of sight from Picton to the houses within the valley. The solution is to create a repeater station on top of the hill in between the transmitter and the receiver. The repeater station is self sufficient by the means of a solar panel and batteries and operates 24/7. Because of this there are two separate WiFi links daisy chained together to provide a connection to the end user. Link 1 from Picton to the top of the hill and link 2 form the top of the hill to the end user.
Link Planning
Several calculations can be made to determine if the equipment you would like to use for your long range WiFi link is up for the task. These calculations include Free-Space Path Loss, Link Budget Estimate, Fresnel Zones and the EIRP. You can download the Ubiquiti Wireless Admin Training Guide which explains all these calculations and the basics of wireless transmissions very well. It is a must read!
If you already are familiar with the calculations and just want a simple spreadsheet which does them for you, you can download link_calculations_v1.0.xlsx below. Might require 64 bit software to get accurate results.
If you already are familiar with the calculations and just want a simple spreadsheet which does them for you, you can download link_calculations_v1.0.xlsx below. Might require 64 bit software to get accurate results.
| link_calculations_v1.0.xlsx |
Free-Space Path Loss
The formula used to calculate FSPL in dB at a given distance is:
FSPL (dB) = 10log10[(4πdf/c)]²
d = distance (m)
f = frequency (Hz)
c = speed of light (m)
Frequencies are chosen depending on the available unused WiFi spectrum at the antenna sites.
Link 1 (Picton to top of nearby hill).
d = 1620m
f = 5,845,000,000Hz
c = 299792458m
FSPL (dB) = 10log10[(4π(1620m)(5,845,000,000Hz))/(299792458m)]²
FSPL (dB) = 111.9737 dB ≈ 112 dB
Link 2 (top of nearby hill to the end user)
d = 1640m
f = 5,785,000,000Hz
c = 299792458m
FSPL (dB) = 10log10[(4π(1640m)(5,785,000,000Hz))/(299792458m)]²
FSPL (dB) = 111.9907 dB ≈ 112 dB
Try out the calculator below for your own values and see the result (Not all browsers are supported).
Link Budget Estimates
The purpose of a link budget is to relate the variables previously calculated to plant for an outdoor wireless link. These variables include path loss, transmit power, and antenna gain. The following formula shows how these variables together can help estimate the RX signal strength for an outdoor wireless link.
RX signal strength = TX power + antenna gains - path loss
Link 1:
2 x Ubiquiti PowerBeam PBE-5AC-500
TX power = 22dBm
TX antenna gain = 27dBi
Path loss = 112dB
RX signal strength = 22dBm + ( 27 dBi + 27dBi) - 112dB
RX signal strength = -36dBm
Link 2:
2 x Ubiquiti NanoBeam NBE-5AC-19
TX power = 26dBm
TX antenna gain = 19dBi
Path loss = 112dB
RX signal strength = 26dBm + ( 19 dBi + 19dBi) - 112dB
RX signal strength = -48dBm
To achieve maximum performance, the signal strength should remain between -40dBm and -60dBm.
Try out the calculator below for your own values and see the result (Not all browsers are supported).
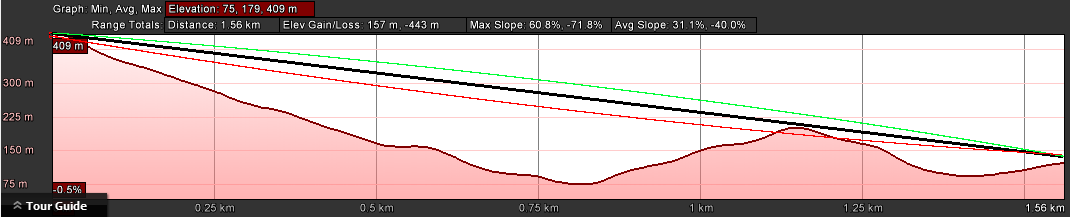
Fresnel Zone Calculations
|
The Fresnel zone defines the area surrounding a line-of-sight link that must be free of obstructions that might cause out-of-phase reflections that can significantly degrade signal quality. The image to the right is an example of a potential client with an obstruction that is within the Fresnel zone of the link. In this case, a signal reflection coy will arrive at the receiver and degrade the signal quality.
|
|
The size of the Fresnel zone depends on the frequency and distance of the link. The formula for calculating the (first) Fresnel zone at a give distance is provided below:
Radius of N (m) = √[(N)(λ)(d1)(d2)/(d1+d2)
N = Fresnel zone (e.g., 1 = first 2 = second)
λ = Wavelength (m)
d1 = Distance from radio 1
d2 = Distance from radio 2
λ = 0.0518m (at 5785MHz)
d1 = 1150m
d2 = 410m
Radius of N (m) = √[(1)(0.0518m)(1150m)(410m)/(1560m)
Radius of N (m) = 3.9567m ≈ 4m
Ubiquiti has made an online tool (airLink) available that does these calculations for you. AirLink can be found here. Or you can try out the calculator below for your own values and see the result (Not all browsers are supported). I simplified the calculator by automatically calculating the wavelength depending on the chosen frequency.
New Zealand Regulations
All WiFi links must meet Radio Spectrum Management (RSM) regulations. The following is a list of regulations assembled by gowifi.co.nz:
900MHz Wireless GURL in New Zealand
2.4GHz Wireless GURL in New Zealand
5GHz Wireless GURL in New Zealand
900MHz Wireless GURL in New Zealand
- 924MHz - 4 watt (36dBm) total EIRP with 5MHz channel width.
2.4GHz Wireless GURL in New Zealand
- 2400 to 2483.5MHz - 4 watt (36dBm) total EIRP
5GHz Wireless GURL in New Zealand
- 5180 to 5250MHz - 200mW (23dBm) total EIRP (Indoor Use Only)
- 5250 to 5350MHz - 200mW (23dBm) total EIRP for Indoor Use or 1 watt (30dBm) total EIRP for Outdoor Use (DFS radar detect must be enabled)
- 5470 to 5725MHz - 1 watt (30dBm) total EIRP (DFS radar detect must be enabled)
- 5725 to 5825MHz - 200 watts (53dBm) total EIRP for Fixed point to point only
- 5725 to 5875MHz - 4 watts (36dBm) total EIRP for Point to Multipoint
Note 2: As each client station is receiving from and transmitting to the one station (the central access point) the client station is essentially employing a point-to-point service and so, in the frequency range 5.725 GHz to 5.850 GHz is allowed the higher power limit of up to 1 Watt peak transmitter power, with up to 200 Watts (e.i.r.p.) peak radiated power. Note that there is a peak power spectral density limitation of less than 17 dBm in any 1 MHz bandwidth. Client equipment on other frequencies covered by the Short Range Device GURL are limited in the same manner as the central access point.
24GHz Wireless GURL in New Zealand
- 24 to 24.250GHz - 1 watt (30dBm) total EIRP (Any Modulation)
EIRP Calculation
You have completed all the above calculations and checked the regulations for your area and now you want to know if your calculations are meeting the legal requirements. First we need to know how to calculate the Effective Isotropic Radiated Power (EIRP). The formula for calculating the EIRP is provided below:
EIRP = TX Transmitter Power + TX antenna gain - Attenuation (Loss e.g. cables, connectors)
Note: A lot of ubiquiti hardware has the transmitter integrated in the antenna and therefor does not use a cable between them. Attenuation can be substituted by 0 or 1dB of loss.
Using same hardware that we used for the previous calculations we can calculate the total EIRP for both links.
Link 1:
Ubiquiti PowerBeam PBE-5AC-500
TX power = 22dBm
TX antenna gain = 27dBi
EIRP = 22dBm + 27dBi - 0dB
EIRP = 49 dBm
Link 2:
Ubiquiti NanoBeam NBE-5AC-19
TX power = 26dBm
TX antenna gain = 19dBi
EIRP = 26dBm + 19dBi - 0dB
EIRP = 45 dBm
Try out the calculator below for your own values and see the result (Not all browsers are supported).
Conclusion
Both links are within the legal requirements for PtP links of 53dBm total EIRP. But link 2 will possible have multiple clients connected to the same antenna and then will become a PtMP link. In that case the TX power will need to be reduced to meet the legal total EIRP of 36dBm for PtMP links. to calculate the maximum TX power allowed use the following calculation:
Max TX power = Total EIRP - TX antenna gain
For example: PtMP (36dBm total EIRP) using Ubiquiti NanoBeam NBE-5AC-19.
Max TX power = 36dBm - 19dBi
Max TX power = 17dBm
Try out the calculator below for your own values and see the result (Not all browsers are supported).
You don't necessarily only use the TX power as the variable that you change. If your over the you can change the antenna with a slightly smaller diameter antenna and that has a lower gain. Or if you want to push towards the boundaries of the legal total EIRP and the transmitter you chose can't output more power you can choose to buy an antenna with a higher gain.
The System
The following is a description of the system as it is currently in place.
The ISP Side
UPDATED - In picton an Ubiquiti PowerBeam PBE-5AC-500-ISO antenna is connected to a VDSL2 connection and pointed to the repeater station on the hill. The PBE-5AC-500-ISO provides a theoretical throughput of 450Mbps, has a 6 degrees beam-width and operates on 5.8GHz. The ISO version has extra shielding which is a must have in an area with a lot off sources that cause interference.
Remote Repeater Station
|
|
The repeater station uses the same Ubiquiti PowerBeam PBE-5AC-500 to communicate with the antenna in Picton. Width a small beam width of 6 degrees we don't flood the whole of Picton with our WiFi signal. For Boons valley an Ubiquiti NanoBeam NBE-5AC-19 is used. This particular antenna has the same theoretical throughput of 450Mbps, operates on 5.8GHz but has a beam width of 60 degrees. By using a wide angle antenna on top of the hill only one antenna is required to connect multiple clients. Also known as a point to multipoint (PTMP). A 5-port switch provides three spare connections for future add-ons.
The repeater station uses the following equipment:
|
PtMP
PtMP is supported on all AC equipment from firmware v7.1.1RC onwards. Any earlier firmwares don't give you the option to create a PtMP access point on NanoBeam and PowerBeam antennas. Download the most recent firmware on the ubiquiti website.
The Client Side
To receive the WiFi connection at the client another Ubiquiti NanoBeam NBE-5AC-19 is used. Because there is no other radio equipment on the hill where the repeater station is located the wide angle beam-width won't cause any interference to other people. When the client does not have a preference for a indoor WiFi router the Ubiquiti airGateway LR will be installed inside the clients house.
Systems Monitoring
Monitoring the system by manually logging into every single device and checking its status is cumbersome. For monitoring and automatic email alerts I use Ubiquity's Aircontrol 2. Unfortunately it doesn't support configuration changes for AC equipment just yet. But it is very useful for group firmware updates.
System Performance
Performance is rock solid!!!
Lessons Learned
There are a few things I discovered during and after having build my first WISP. Some of these lessons can be used to improve future systems and some are useful to keep in mind when planning a new system.
Antenna's
With the System I build the client side uses an Ubiquiti NanoBeam NBE-5AC-19 antenna. The main reason for choosing this antenna is, a small antenna is less noticeable on the side of your house.
For the PtMP I use Ubiquiti NanoBeam NBE-5AC-19 too. Although the beam width is a bit wider then a proper long range directional antenna, A future upgrade could be a sector antenna either 45 degrees or 60 degrees. (UPDATE: A single NanoBeam NBE-5AC-19 is covering all my clients and I don't have a need to change out the antenna with a wider beam.) A handy tool to check if properties are within the beam width of the antenna is "Area calculator tool by google maps" which can be found here.
For the PtMP I use Ubiquiti NanoBeam NBE-5AC-19 too. Although the beam width is a bit wider then a proper long range directional antenna, A future upgrade could be a sector antenna either 45 degrees or 60 degrees. (UPDATE: A single NanoBeam NBE-5AC-19 is covering all my clients and I don't have a need to change out the antenna with a wider beam.) A handy tool to check if properties are within the beam width of the antenna is "Area calculator tool by google maps" which can be found here.
References
Ubiquiti, (2012-2014). Ubiquiti Carrier Wireless Admin V1.3. 1st ed. e.g. England: Ubiquiti.
gowifi (2015). wifi basics. [ONLINE] Available at: http://www.gowifi.co.nz/wifi-basics/getting-the-most-out-of-your-wireless-network.html. [Last Accessed 21 April 2015].
gowifi (2015). wifi basics. [ONLINE] Available at: http://www.gowifi.co.nz/wifi-basics/getting-the-most-out-of-your-wireless-network.html. [Last Accessed 21 April 2015].