|
The summer holiday is here and that always provides me with some time to make physical changes to the WISP equipment. Last year I made all the preparations to be able to swap the WiFi dishes over to a newly installed stronger mast. But unfortunately I ran out of time and good weather back then to finish the job. So this holiday it was at the top of my priority list to finish this. I also noticed that the RF armor radio cover had become brittle by the NZ sun and had been blown apart. So a good time to fix that too. And our previous weather installation wasn't installed particularly well and would cause some partial shade on the solar panel. This weather station was decommissioned some time ago so I figured I could just remove the old mounting hardware. But...
On arrival I spotted that the the local paragliders had installed the new weather station on our repeater box using the old mounting hardware. And even more damage was done by installing the weather station controller above our solar panel ?♂️ See photos below.
In the end we spend almost three hours on two jobs. One, swapping the dishes over onto the new mast and aligning them again. Two, fix up the weather station install. The weather station also had another installation defect. The arm wasn't installed facing north, so the wind direction was always reported incorrectly. In the last couple off photos you can see that the weather station and controller have been moved backwards as not to create a shade over the solar panel. And the wind vane arm has been installed facing north instead of west.
The North facing camera still causes some shade over the panel at the very end off the day but that doesn't worry me too much. I might take a hacksaw next time and trim the lower waratah that also cast a bit of shad in the evening.
0 Comments
On my last day of the Christmas holiday I did a quick run to the repeater station. Some time ago someone had forcefully repositioned my cameras and damaged the mounts in the process. Afterwards not much force is required to change the angle again and a few months back one of the cameras had slightly moved again. Probably a possum has climbed over it. I took the mount apart and added a O-ring the the ball mount housing to take the slack out. I might experiment some more with youtube live. Maybe run it for 2 hours every second day to not drain the batteries too much and consume too much data. keep an eye out on the cameras here. It is always interesting checking the signals from town that my 2010 MacBook Pro can pick up. These include 2G and 5G so not everything can be assumed as interference since I use 5G equipment. It also doesn't include signals that use proprietary protocols that the MacBook that recognise and it doesn't show signals wit hidden SSID's. It's always makes me wonder why some places reach so far which such signal strength when they only need to cover a small area. For example: why am I picking up motels and hotspots on my laptop 1.6km away? When will they use enterprise hardware with multiple access point working together to get the coverage instead of one or two high powered sources that spill RF interference everywhere. I will try one day to do a RF scan with my Antenna network. Because of my current configuration I would have to do that at times that nobody will be using it because it will take the. network offline and carrying out these tests. 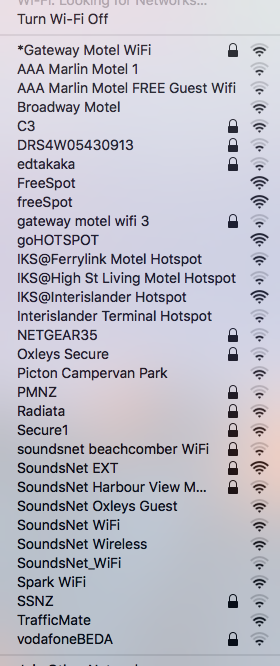 Last weekend I went back to Picton for the weekend to celebrate my birthday with family and friends. This gave me the opportunity to swap out the TOUGHswitch TS-5-POE out for the new Netonix WS-8-150-Dc. In this blog post I wanted to show you some of the features related to power monitoring and management, 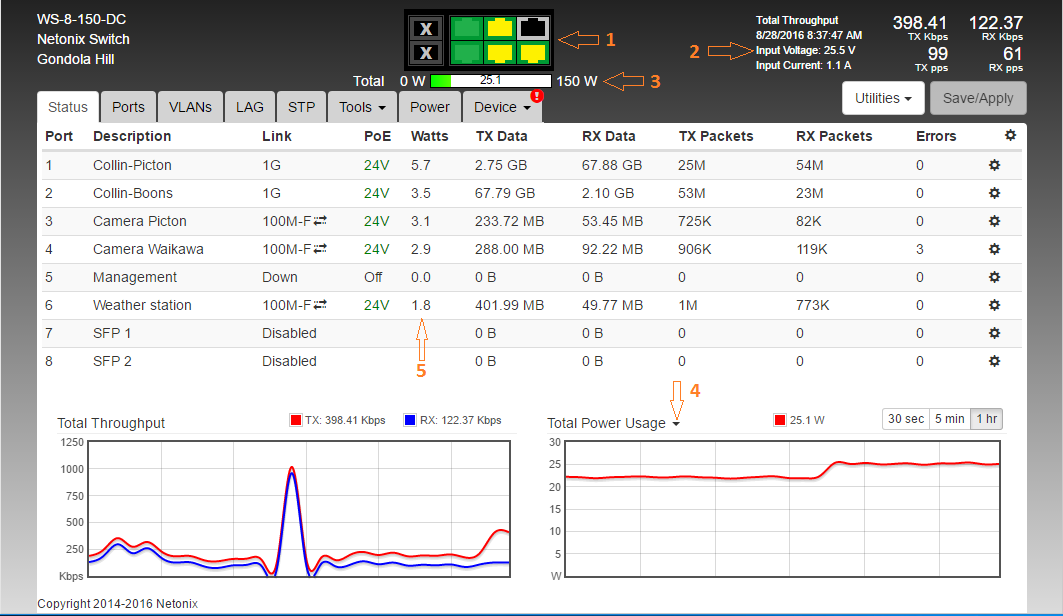 I have drawn in some arrows in the screenshot above and the following will be about those features.
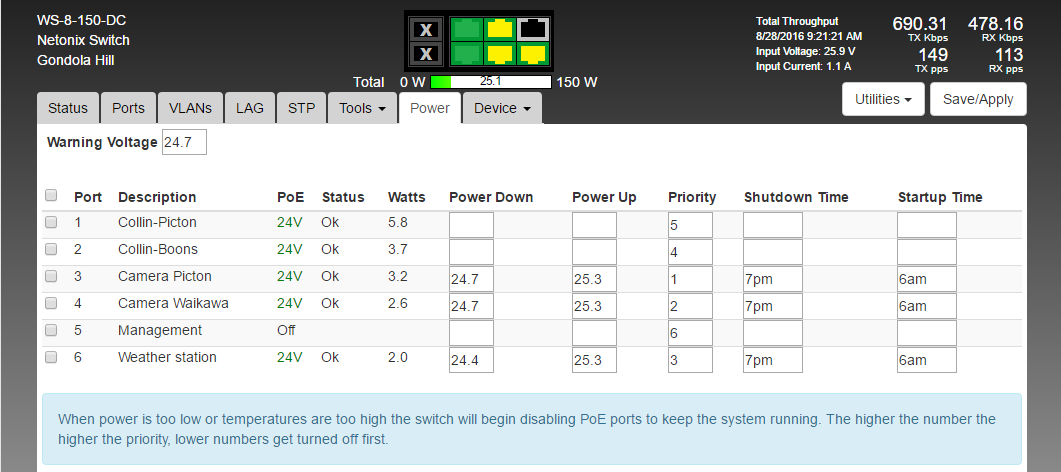 Here you can see the power management page. These are the interesting features.
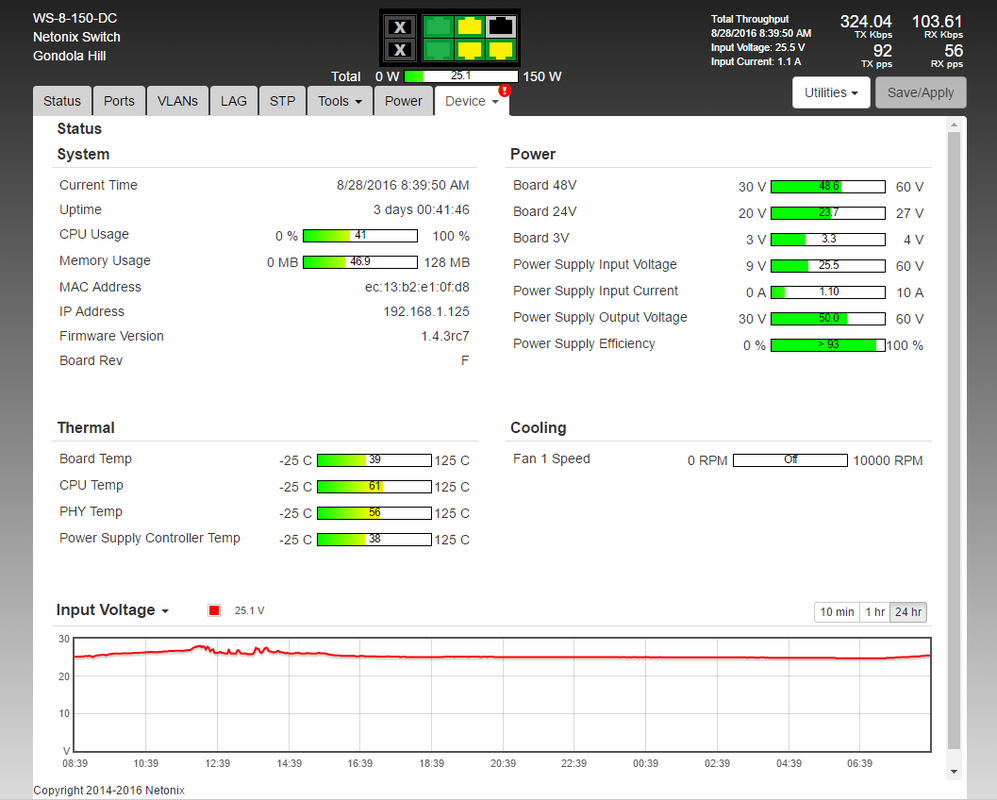 This is the device status tab. Add the bottom we have the input voltage over time. In the screenshot we see the last 24 hours. In my case we are looking at the battery voltage of the last 24 hours. It gives an idea how well they get charged depending how fast the line rises. And sudden drops can be because of POE device being turned on automatically. What's next?I would like to set up a SNMP server to collect important data for the whole system and create graphs that go back further than 24 hours. Collecting more data and analyzing it could provide me with some tweaks I could make to the system to create an even more stable system.
The last few weeks the system has had outages a few times because of flat batteries. Most of the times it would stop in the middle of the night and come back on around 10AM after a little bit of sunshine. In this post I will describe some changes I hope to make very soon and why I didn't have some of them implemented from the start. Means of reducing power usageThere are two easy possible ways I would like to apply to reduce the amount of power used over the course of a single day.
When I analyse the general data usage over the course of several weeks and look for patterns. Especially when no data is going though the system, it becomes clear that after 1Am and before 7AM nobody uses the internet. This is a quarter of the day that the system is using power to maintain a connection but otherwise is not being used. I could save several Watts of power by automatically turning the antenna's off and on at these times.
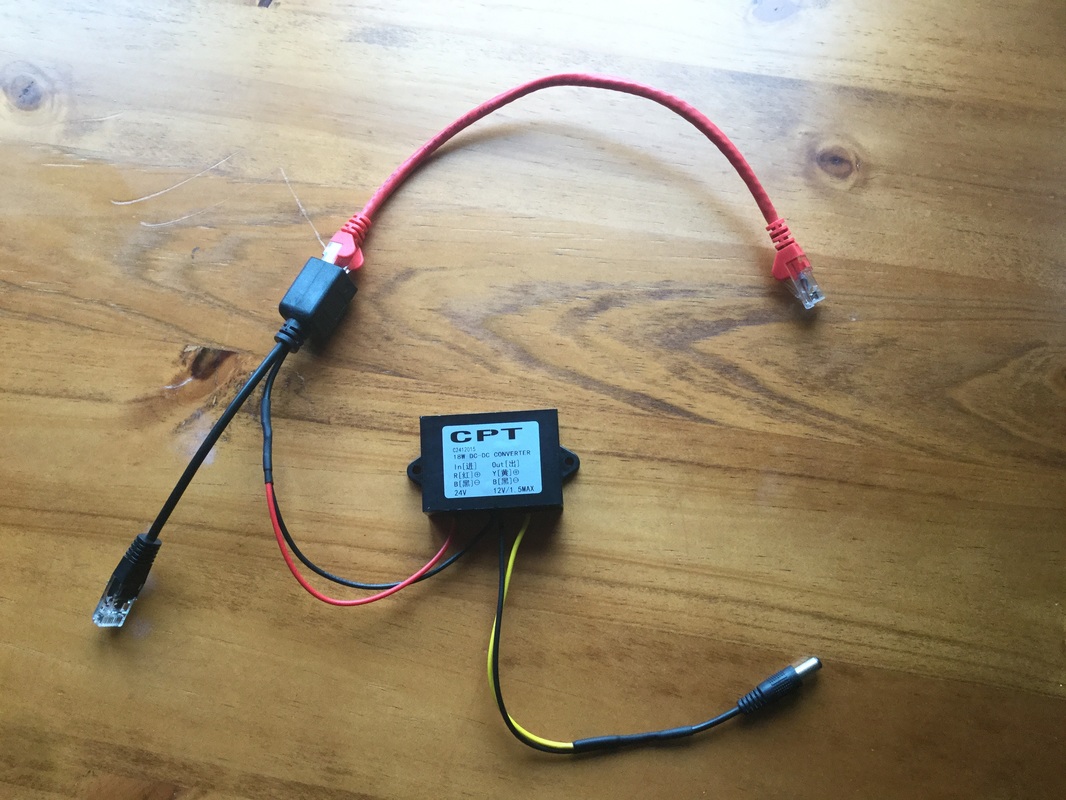
being stepped down to 12VDC and powers the camera through a barrel jack. If the switch turns POE off then the camera will turn off to. I have something similar for the weather station. Voltage based rules I want to turn devices off and on automatically depending on preset voltage thresholds. Further on in this I will talk about the hardware I plan to use for this. First have a look at what the battery voltage tells you about the state of charge. 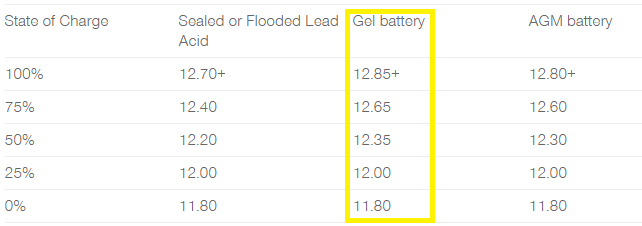 I have two Gel batteries in series to create a 24V system so in my examples I will multiply these numbers by two. The manufacturing recommends to not go below 50% if possible. Which would be 24.7V in my case. The solar regulator has a Low Voltage Disconnect at 23V and a Low Voltage Reconnect at 25.2V. Unfortunately these thresholds can't be configured on the solar regulator I use. As you can see from the above chart 23V is way too low. By using voltage rules I want to turn of lower priority equipment to reduce the amount of power used when the system is batteries a re getting depleted below a certain level. At the moment I have three different priority devices:
Switch with power managementCurrently the system uses a Ubiquiti Toughswitch-5. This is a passive POE switch. It requires a stable 24VDC input. To run it from my batteries I use a DC-DC converter to create that stable 24VDC so not to blow up the equipment on a sunny summers day when battery voltage can go over 28VDC. The Toughswitch doesn't have any battery monitoring or power management settings because it doesn't know anything about the battery voltage. Unfortunately it also doesn't have any time based rule set you can configure.
When I designed the system I was looking at the Netonix WS-8-350-DC but it had already been discontinued. This is a smart switch with build in Voltage Regulator so it can run straight from the batteries, has build in power management/rules and time based rules. Now over a year later they finally released its successor the WS-8-150-DC. Unfortunately it is currently out of stock in New Zealand. But I will try to get my hands on one as soon as possible.  I apologize in advance for the not so easy to see line in the image. I hope you can see the two lines well enough.
The thicker line at the top and who is wider shows Solar Radiation in Summer. This is a recording of an almost perfect day and close to the summer solstice. The sun rises around 6am and 6pm with a peak output of 1000 Watts per square meter! The thinner line shows Solar Radiation in Winter. This is a recording of an almost perfect day and close to the winter winter equinox. It is a bit skewed because I think a hilltop blocks the sun early. But as you can see The less optimized position of the light sensor and the shorter days are clearly visible. The Solar Radiation climbs around 8am peaks at just over 400 Watts per square meter and has already dropped halfway by midday. And that's on a good day. Recently the solar powered repeater station went offline because the batteries went flat. For almost a week there where clouds. We where lucky if there was between 200 and 300 Watts of solar radiation for more than an hour. Bur with solar panels only around 14% efficient this was not enough to put more energy in the batteries than the system would use. I did expect this to happen one day. You can only pay for so much redundancy with batteries. And batteries are very expensive. I am surprised it took more than a year for it to happen. But I guess my recent experiments with live streams from the cameras where a big drain on the batteries. Something more suitable for summer. Would a wind generator have helped? Unfortunately this time, no. Together with the clouds there was an absence of wind. Only near the end of the last cloudy day the wind picked up but by that time my system had just charged enough to go back online. I have plans for improvements which I will discuss in a future post. |
AuthorGeorge Timmermans, Research Toolmaker, Software Engineer and Tinkerer 
Archives
March 2024
Categories |
 RSS Feed