|
I ordered myseld a ESP8266 (model ESP-201) WiFi module to experiment with. These modules are really popular at the moment because you can get the for 4NZD of eBay and consist of a 160mHz ARM processor and 512Kb of flash ( some versions have up to 4Mb) and have a full WiFi stack build in. They contain several IO pins that you can access and one analog to digital converter(ADC). It also support interrupts on most pins,
While I wait for the module to arrive in the mail I decided to have a look what needs to be done to port my weather station code over to this device. Actually it is fairly simple. First you need to install the ESP8266 Arduino library and replace the ethernet library at the top of the sketch with the ESP8266 WiFi library. Second we need to change over from initialising the ethernet library to initialising the new wifi library. This includes the SSID and password of the network you are trying to connect to. Thats all that isrequired for connecting to wunderground through the ESP8266 with my original project code. In my original code I use A1 for reading the position of the wind vane. The ESP8266 only has one ADC so the pin number to be used is A0. The ADC on the ESP8266 has an input voltage between 0V and 1.1V. A extra voltage divider is required to get a valid output when using a VCC of 3.3V. Connect the anemometer to a valid interrupt capable pin in change accordingly in the code. The Unified Sensor Library from Adafuit gave me an error along the lines of couldn't include <avr/pgmspace.h>. I fixed this by editing Adafruit_Sensor.cpp. The original looks like this:
I changed it to this:
Save the .cpp file and restart the Arduino IDE before recompiling the project code.
After these changes the code compiled without errors. Until I receive the actual hardware this is as much as I can do. Ones I tested the code with an ESP8266 i will make the ported code available on my github page.
0 Comments
Recently I had the change to talk to some of the Picton paragliders and received vary positive feedback for the weather station near the paragliding launchpad. I know they have multiple gliding sites around Marlborough which takes a fair bit of time to get to. And often when they arrive at one of those locations the flying conditions aren't as good as they had hoped for. So I decided to have a look what it would take to make a solar powered stand alone cellular weather station. Theoretically if everything comes together well they could be easily reproduced and quickly deployed on locations that have 2G coverage.
So why 2G? First off, I can't really on an ethernet or WiFi connections at the remote locations where these weather stations will be most likely deployed, Secondly Vodafone will support 2G at least till 2020. Also programming wise 2G is less complicated then 3G. So it might not be guaranteed future proof after 2020 but I have the feeling that components might have to be replaced after four years out in the NZ sun anyway (NZ has really high UV levels). Solar power will be used to charge the batteries that will provide power for the weather station. Again this will be required because most locations won't have a power source readily available. Here is a list of components I was looking into:
Yesterday I finally had the change to go to the repeater station and change out the microprocessor that was reading the sensor data from the weather station and pushing it to wunderground. The reason for the upgrade was that I never intended to use the microprocessor that was in there (Arduino Uno + Ethernet Shield) but I ended up having to use it while I would try and get the Teensy 3.1 hardware working.
I believe there was a defect in either the Arduino IDE or the Teensy plug-in that caused the etherent library to not function correctly. When I uploaded the same program after installing software updates for the IDE and Teensy plug-in everything worked as expected. And I addressed a software defect that resulted in reporting windgust of over 800 km/h every once in a while. I borrowed some code that would read the anemometer pulses and convert it into windspeed and windgust. To catch the rotation of the anemometer an Interrupt Service Routine (ISR) is triggered every time it does a full rotation. I discovered that there was a shared resource that didn't use mutual exclusion when the windspeed was calculated. So in the odd occasion it happened that the windspeed was to be calculated while the variable within the ISR was changed resulting in odd results. Once the cause was identified it was easily solved by adding noInterrupts(); before the calculation and interrupts(); after the calculation to guarantee mutual exclusion. The "Internet of Things", phrase used when a ordinary "dumb" device is connected to the internet to make it a "smart" device. From coffeemakers, and lightbulbs to door locks and heat pumps. For some more examples of existing IOT products have a look here. While controlling some things of your daily life remotely over the internet seems convenient I see it as being a gimmick with huge security and privacy issues. So I write this blogpost outlining how IOT can be abused and show some examples where it already has happened in the past. Baby monitors and security camerasMore and more stories are popping up of parents finding out that people have been watching and talking through internet connected baby monitors. A recent security study discovered a severe lack of security in all the models they tested. So you want some cameras, either for security or just to see who is at the door but you think it is interesting to see the video feed while you are at the office. The following scenario might be unlikely to happen but that doesn't meant it won't. You now provided a video feed where someone can remotely track people coming and going form your house and analyse your behaviour. A skilled hacker could even program motion detection for the video and timestamp any activity. No more stake outs targeting one location at a time. Just a computer monitoring hundreds of camera feeds, discovering patterns in your lifestyle and determining the best time for breaking in. A semi digital organised crime. Wilful damageWhat about some other damage that can be done remotely. While you may think it to be convenient to turn your heat pump on 30 minutes before arriving home, a hacker could do the same. How are you going to explain to the power company that it wasn't your doing that the heat pump was on while you where on holiday? Is it worth it?Is it really important that you have a mattress liner that records your sleeping habits in the cloud, or being able to turn your coffee machine on while you're in the bus on your way home? Software security is not easy. Therefor we can't rely that every IOT product we buy will have strong security measures in place. With every added device you provide a new attack vector into your private life. Tips for IOT devicesIf you do use or plan to use internet connected devices I have a few tips for you:
While checking one of the open source electronics websites I came across instructions on how to make some costume goggles with individual addressable LEDs.
But just following some assembly instructions and uploading some code isn't a challenge for me. So I decided to make my own advanced version of these goggles. 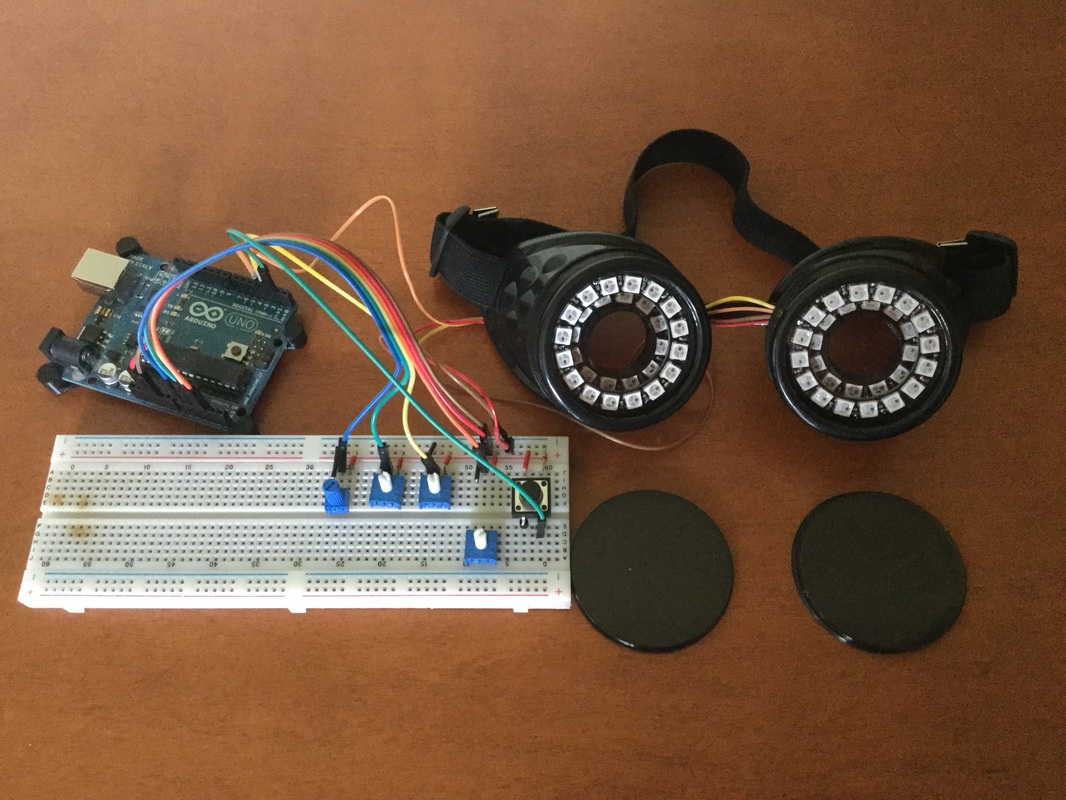 Here are my goggles in the current prototyping stage. The main difference is that I don't have one LED ring per eye but two. As you can see the goggles house a 24 LED and 16 LED ring. To accomplish this I designed and 3D printed an insert that hold the LED rings neatly in place but still provide access to the soldering pads. I also designed it in such away that it prevents light leaking to the sides. So they goggles could be safely worn even when the LEDs are on. Manual ControlsI thought about adding Bluetooth capabilities but since I don't own a smartphone and don't want to walk around with an iPad during parties I opted for manual controls. At the moment I use three potentiometers and a button.
The code is non blocking and uses a state machine for the animations. The button uses an interrupt but it doesn't have to be. By using timed events and a state machine instead of delays it is easier to create steady frame rates, react faster to buttons and dials and future proofs it for hardware like bluetooth where we need to be able to detect incoming data. 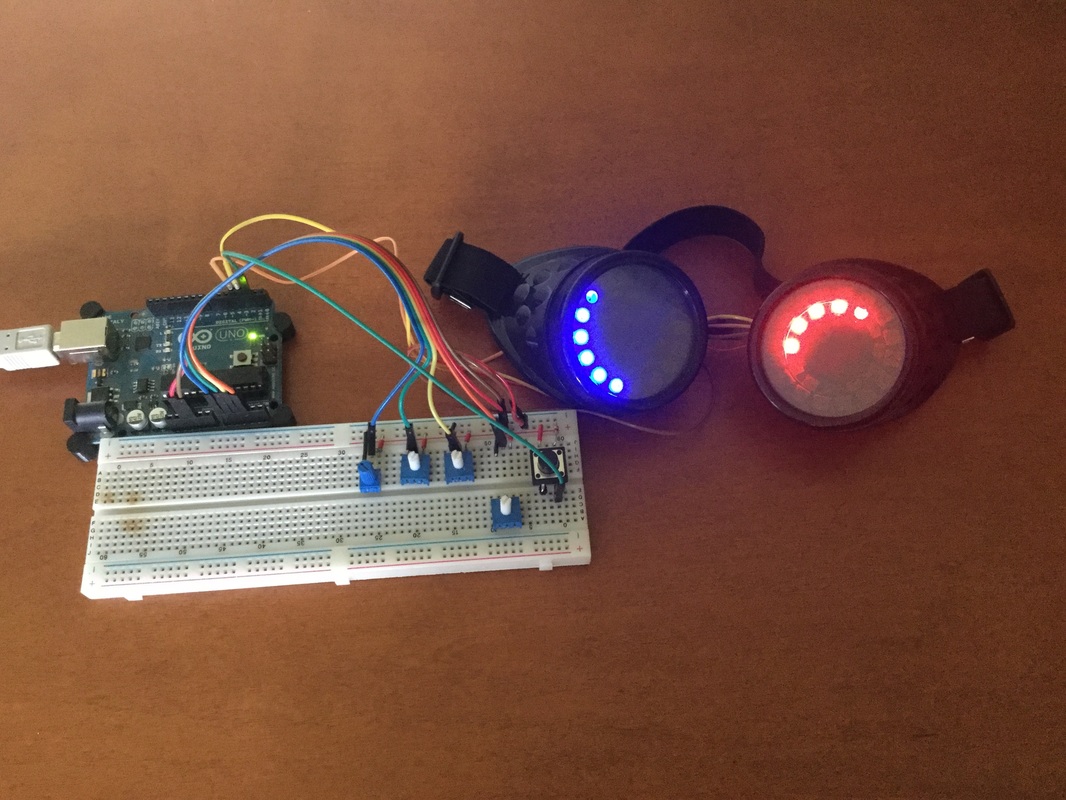 The code is really scalable. It is just a matter of adding a new animation to the switch case. Hardware ChoicesThe idea is that the finished project will be fully contained around the goggles. This will include the micro controller, manual controls and battery. The LEDs require 5V logic. Therefor I ordered something similar to an Arduino Micro for the final version of the goggles. It has a small form factor and removes the need for logic level shifting. I will be on the lookout for some cooler looking potentiometers and buttons.
It will also require designing and 3d printing an enclosure that will contain the micro processor, batteries and controls. But that will be a post for another time. |
AuthorGeorge Timmermans, Research Toolmaker, Software Engineer and Tinkerer 
Archives
March 2024
Categories |

 RSS Feed