|
I have taken an interest in Meshtastic (An open source, off-grid, decentralized, mesh network built to run on affordable, low-power devices). For more information see: meshtastic.org/
I have a couple of device and have been playing around with swapping out antennas. One of the things to take into consideration is configuring the correct transmission power for the device, antenna and frequencies I am using. In this post I will provide a quick overview on how to calculate the Max TX Power in dBm. Jargon buster:
For this example I will use the New Zealand regulations for General User Radio Licence for Short Range Devices: gazette.govt.nz/notice/id/2022-go3100 EIRP It includes the following details: Low (MHz): 915.0000 High (MHz): 928.0000 Maximum Power dBW e.i.r.p.: 0.0 As I prefer to calculate using EIRP in dBm, the EIRP requires a simple conversion. dBm=dBW + 30 30dBm= 0.0dBw + 30 Total EIRP = 30 dBm GAIN To find the TX antenna gain it's easiest to get it from the antenna specification. For example I am using GIZONT 17cm antenna with a 10dBi gain. ATTENUATION As my devices have the antenna connected to the device motherboard I am going to assume the attenuation (Loss e.g. cables, connectors) to be effectively 0dB. To calculate the Max TX power: Max TX power = Total EIRP - TX antenna gain + Attenuation 20dBm = 30dBm - 10dBi - 0dB
0 Comments
My partner got into candle making and it sparked (pun intended) my curiosity. Have you ever bought a product online and it didn't quite live up to your expectations? That's exactly what happened to my partner when she purchased several moulds for candle making. Although advertised as candle moulds, they turned out to be more suited for soap making and therefore impractical for their intended use. As someone who enjoys a good DIY project, I decided to take matters into my own hands and find a solution to our problem. Having previously watched various videos on the topic of silicone mould making, I began researching how to make a silicone mould based on a 3D printed object. To my surprise, the process seemed fairly straightforward. First, I needed to create a 3D model of the candle I wanted to make. But as a short cut for this first attempt I downloaded the Twisted Heart Vase by Gyorobot and printed it using our 3D printer. Next, I needed to create a box to contain the silicone while it cured, which I made using cardboard, a trimmed down water bottle and hot glue. After that, I mixed the PINKYSIL® – fast set silicone and poured it into the box, making sure to cover the 3D printed object completely. The silicone then needed to cure for an hour before it was ready to use. Once cured, I removed the 3D printed object from the silicone mould, and it was ready to use for candle making. Not only was this a fun and easy DIY project, but it also solved our problem of impractical candle moulds. By using a 3D printed object to create a custom silicone mould, we were able to make candles that fit our specific needs and preferences. So, if you ever find yourself in a similar situation, don't be afraid to get creative and try out some DIY solutions! PS. Maybe this particular shape didn't make for the most practical candle because it has a large undercut. Lesson learned. For a while now I have been keeping an eye out on how I could contribute to the community. When I was around 16 years old I volunteered at a museum restoring and maintaining steam engines (I kid you not). I designed, build and maintain to this day a wireless internet service provider network providing internet to a rural community (see my projects section) but it practically runs self sufficient other than the occasional software update. It left me wanting to do more. I scoured the internet for any volunteer work near me that looked like something I might enjoy. I can’t remember exactly how but one day I stumbled across an event called “The Upper Hutt repair café” and it intrigued me. What is a repair café? A Repair Café is a meeting in which people repair household electrical and mechanical devices, computers, bicycles, clothing, etc. They are organised by and for local residents. Repair Cafés are held at a fixed location where tools are available and where they can fix their broken goods with the help of volunteers. Its objectives are to reduce waste, to maintain repair skills and to strengthen social cohesion. (Source: Wikipedia) That sounded right up my alley. Unfortunately the next upcoming event got postponed because of COVID-19 so I didn’t get a change to check it out. Instead I emailed the organisers and instead of trying to write in an email what knowledge and skills I might be able to bring to the table. I have since attended two events and I am looking for forward to the events to come. During the January event I was able to put the 3d printer to good use. My first client brought in a mechanical board game which was missing a little spur gear. There where other gears still present which I could use to take the dimensions from and it didn't take long to design it up in fusion 360 and print a replacement. My second client brought in a broken remote for a Rise & Recline lift chair. The thumb switch had broken off and no spare parts are available anymore. It was possible to buy a second hand remote for a lot of money. Instead I designed a need thumb switch that fitted on the original broken part and could be glued in place. It's a lot of fun showing the potential of 3d printing and seeing the excitement of the visitors when a sketch becomes a functional part within 30 minutes.
If you are interested in visiting the Upper Hutt repair café, I suggest you follow them on Facebook "Upper Hutt Repair Café Trust @uhrepaircafe" or find a repair café near you! My workplace organised a AWS DeepRacer competition and a few colleagues and I where keen to give it a go. We received a 30min walkthrough about the basics and which track we where going to race and then left us to our own devices. With AWS DeepRacer you train a virtual car to go around a lap by writing a reward function. You either reward or punish certain actions and over time it should learn how to go around the track while acquiring the most reward points. Which hopefully corresponds with a fast lap around the track. We didn't spend a whole lot of time researching on what a great reward function might look like and in the end we used a function that added a few example functions together. It used three metrics.
As you can see in the video the car was not driving in a smooth fashion at all. So we ended up adjusting metric 3 and punish steering heavily and train it for another hour. Even though the logs looked very promising, the real world experience was far from great. While the large turn was very smooth, the sharp turn got completely ignored and the car would drive straight into the wall. A great example why I wouldn't want to write mission critical software where lives are at stake. Overall we had a great time and learned a bit more about machine learning. In the end we came fourth place. What would I try next time? Apparently the default training parameters weren't particular efficient. Learning more about the training parameters and how to configure them for better results. And probably remove the steering parameter from the reward function. IF trained well, the model should figure out itself to not steer a lot.
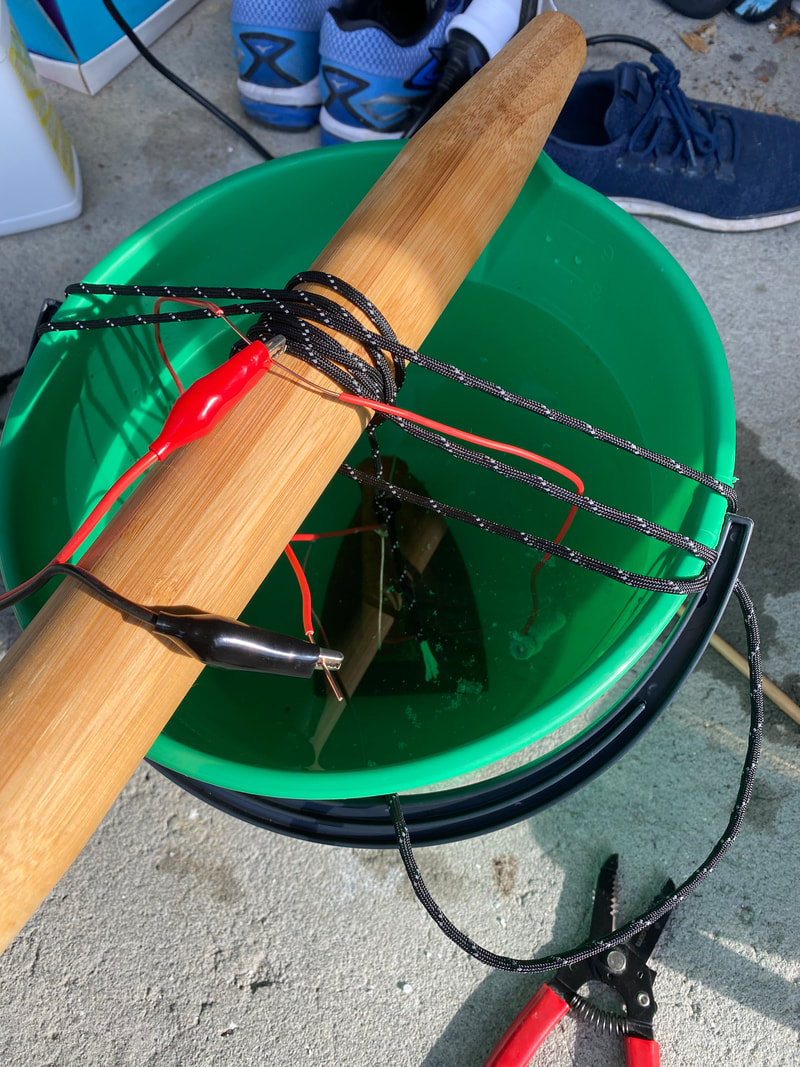
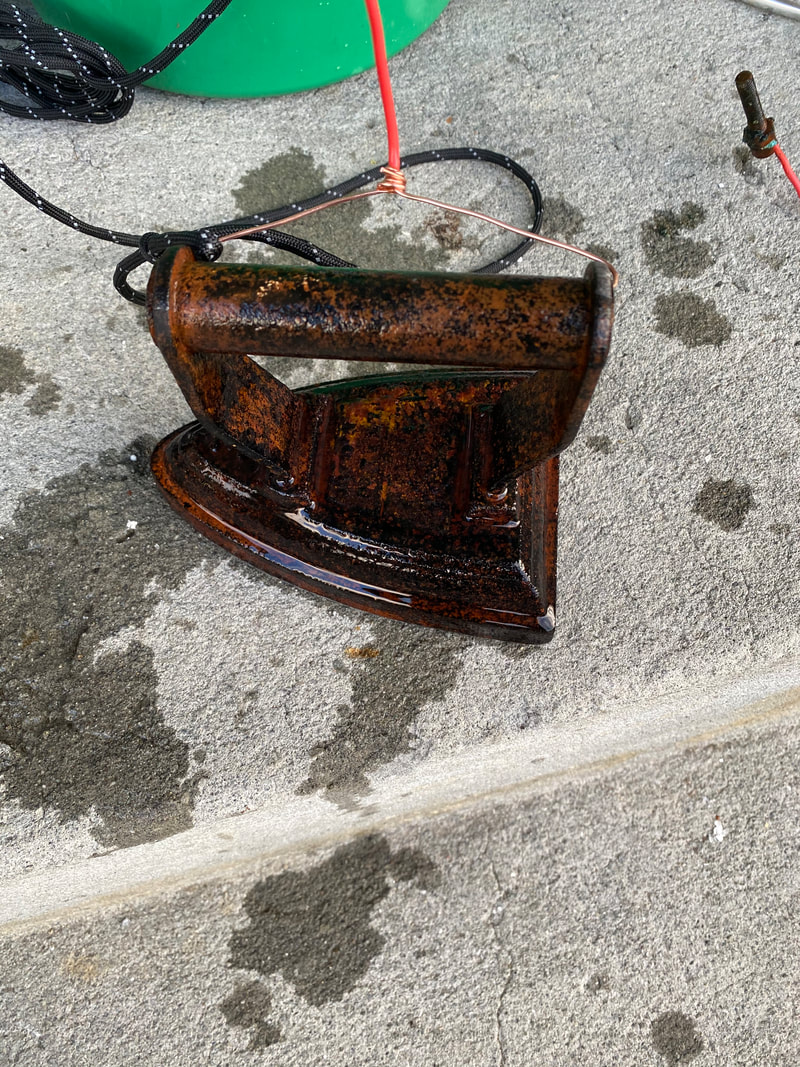
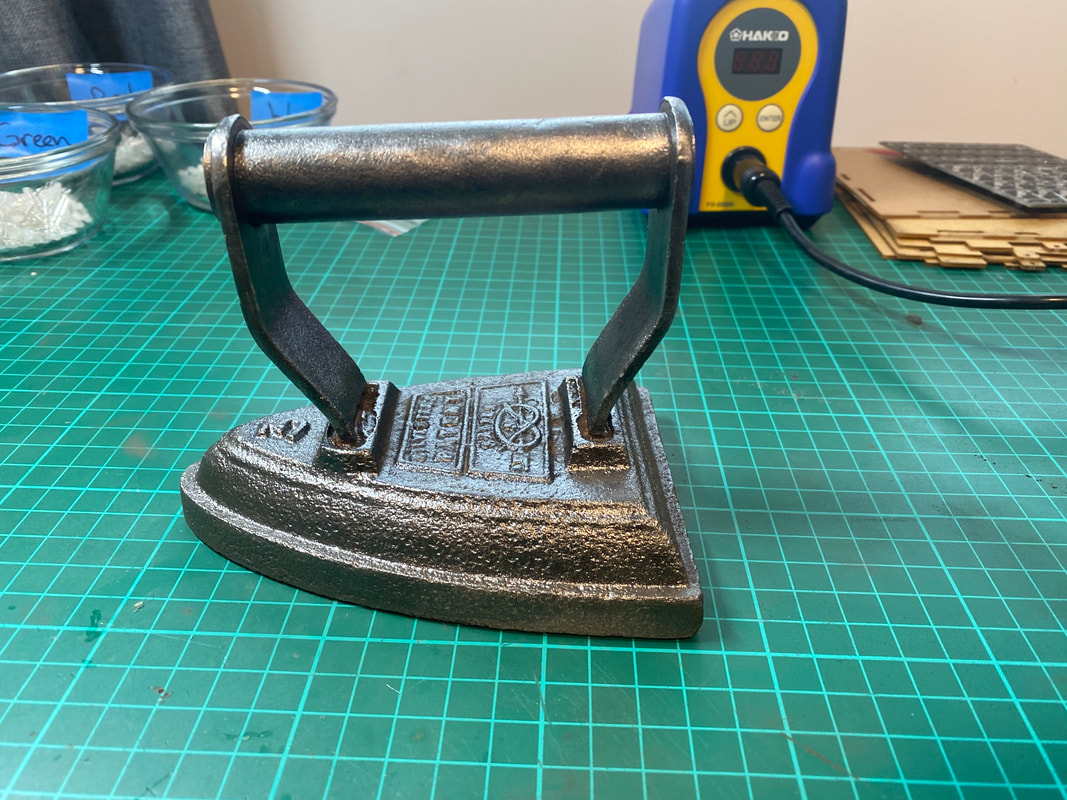
My mother acquired a rusty antique Salter iron number 3 and asked me if I could restore it. I had seen videos of rust removal using electrolysis and I was keen to try it myself. After a little bit off researching I decided on using the most common method using washing soda and a low dc current. Unfortunately I didn't have a decent size of metal for a sacrificial electrode and had to use some small steel bolts that I had on hand. This was not very effective because of the small surface area these tended to oxidise very quickly and reducing the current flow. For the power source I used a bench top power supply set to 6VDC. I managed to get some rust off using the electrolysis and a clean up with some steel wool left a pretty decent result. To get it even more polished I used a brass wire brush in a cordless drill for the large surfaces and small wire brushes in a rotary tool to get into the nook and crannies. Overall I am pleased with the result. If I try electrolysis another time I will use larger electrodes to speed up the process. |
AuthorGeorge Timmermans, Research Toolmaker, Software Engineer and Tinkerer 
Archives
March 2024
Categories |


 RSS Feed