George timmermans
  • About Me
    • Resume
    • Press releases
  • Blog
  • Projects
    • Amateur Radio
    • Long Range WiFi Link
    • Embedded Systems >
      • Photo Booth
      • Classroom VU meter
      • USB Media Controller
      • Weather Station
      • Arduino Swimming Pool Controller
      • GRBL Android Controller
      • Arduino Serial Driver
      • Arduino Multitasking
      • 8x8x8 LED Cube
      • Analog -> Digital Geiger Counter
    • 3D Printing >
      • Simplify3d Configuration
      • 3D print repairs
    • Home Brewing >
      • Mead Recipes >
        • Cinnamon Mead
        • Sweet Chili Mead
        • Lemon & Ginger Mead
        • Mead Liqueur
        • Honey Beer
      • Glühwein (Spiced Wine)
      • Limoncello
    • House
    • Toolmaking
    • Laser Cutting
  • Weather Cam
  • Contact

Raspberry Pi Photo-booth and Parts

5/10/2016

1 Comment

 
I have been busy ordering some of the parts required for this project. Since some of the stuff is ordered from early it will take a while for them to be delivered. Here is a list of some of the components I will be using, subject to change:
  • Raspberry Pi 2 model B+
  • 5MP PiCamera
  • 10W 12V DC  Pure White LED Floodlight for the flash
  • ​2x MOSFET Module to control the flash by the Raspberry Pi
  • 7" Touch screen
  • 12Vdc/5VDC power supply (make sure you get the 2.5A version)
  • Micro-USB to barrel jack  
  • 100mm dome push button
Some components are not on the list because i already have them. For example a spare Molex connector and  2.1mmx5.5mm barrel plug to make the power adapter cable.

Seer the (rough) circuit diagram below on how the flash will be connected though the MOSFET module. The same circuit will also be used for the light in the dome button and using it as a status indicator. Only difference is that it will use  a different GPIO pin.
Picture
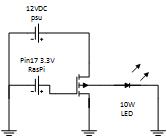
Ground must be from a common source which if you use the PSU from the list above will meet that requirement. The LED is connected on the 12VDC power circuit and trough the MOSFET which will act as a normally open switch. The raspberry Pi will provide a 3.3VDC signal when a photo will be taken which will "close" the switch and the turn on the LED. 

When I have all the actual hardware I will show how to connect everything up. And I will share the changes required to the open source software I am using to get the flash working.

Finished Photo booth

For the finished photobooth and some build instructions visit my photo booth project page.
1 Comment

Raspberry Pi Camera Struggles

2/10/2016

2 Comments

 
Last week I was asked if I could build a photo booth for this years Christmas party. As example I was shown this fun photo booth based on the Raspberry Pi. See the video here.

I was told to keep it simple and use whatever open source projects I could find and focus on the device itself rather than an extensive set of features (KISS, Keep It Simple Stupid). Luckily someone had already open sourced a nice simple version of a Raspberry Pi photo booth, see here. The one thing that is missing from this particular version that the other one has is a build in flash function. So after a little bit of digging around I found that you should be able to change the firmware on the Raspberry Pi to enable the flash by default. 

So I get borrowed a Pi 2 model B+ and a camera from and friend and followed these steps to get the flash working. And it was giving me heaps of problems. Turns out the documentation is a bit out of date. So here is what I did. This is based on my install of Raspbian (not a Noobs install). Some of these steps are slightly modified from the ones I found while researching possible solutions. Credits to the people on the Raspberry Pi forums helping each other out.

Update: I added my flashdriver as a file below the instructions on how to generate it yourself.

    
Update: download the file below instead of running the steps above.
dt-blob.bin
File Size: 39 kb
File Type: bin
Download File

Connect a LED with a resistor between pin17 and ground.

Now in your GUI go to Start->Programming->Python 3 (IDLE)
Insert the following python script: 


Finished Photo Booth

For the finished photo booth and some build instructions visit my photo booth project page.
Save it Ctrl+S and run it with F5.
2 Comments
Forward>>

    Author

    George Timmermans, Research Toolmaker, Software Engineer and Tinkerer

    View my profile on LinkedIn

    Archives

    March 2024
    April 2023
    January 2021
    November 2020
    July 2020
    May 2020
    November 2019
    August 2019
    January 2019
    October 2018
    January 2018
    November 2017
    October 2017
    August 2017
    June 2017
    May 2017
    April 2017
    March 2017
    January 2017
    December 2016
    November 2016
    October 2016
    August 2016
    July 2016
    June 2016
    May 2016
    April 2016
    March 2016
    December 2015
    November 2015
    October 2015
    September 2015
    August 2015

    Categories

    All
    3d Printing
    Photobooth
    Wisp

    RSS Feed

Proudly powered by Weebly
  • About Me
    • Resume
    • Press releases
  • Blog
  • Projects
    • Amateur Radio
    • Long Range WiFi Link
    • Embedded Systems >
      • Photo Booth
      • Classroom VU meter
      • USB Media Controller
      • Weather Station
      • Arduino Swimming Pool Controller
      • GRBL Android Controller
      • Arduino Serial Driver
      • Arduino Multitasking
      • 8x8x8 LED Cube
      • Analog -> Digital Geiger Counter
    • 3D Printing >
      • Simplify3d Configuration
      • 3D print repairs
    • Home Brewing >
      • Mead Recipes >
        • Cinnamon Mead
        • Sweet Chili Mead
        • Lemon & Ginger Mead
        • Mead Liqueur
        • Honey Beer
      • Glühwein (Spiced Wine)
      • Limoncello
    • House
    • Toolmaking
    • Laser Cutting
  • Weather Cam
  • Contact